

MSR Snowshoe Review:
Women's Revo Ascent
By Diane Spicer
This MSR snowshoe review kicks around the merits of putting a pair of Revo Ascents on your feet.
What's that you say?
You're just getting started with snowshoeing?
You're going to need warm, durable winter boots before you look at the best snowshoes for your winter hiking plans.
- Read the Hiking For Her review of Baffin boots here.
- They're the boots you see in this MSR snowshoe review.
No one asked for, or paid for, this review.
My own money was used to purchase these snowshoes, and all comments and photos are my own.
One more disclosure in this MSR snowshoe review:
I wore a men's pair of MSR shoes for 8 seasons of snowshoeing, and was delighted when women specific designs for narrow(er) strides and smaller boots finally hit the market.
- So I was already sold on the durability and good performance in backcountry conditions.
- Now it was time to upgrade.
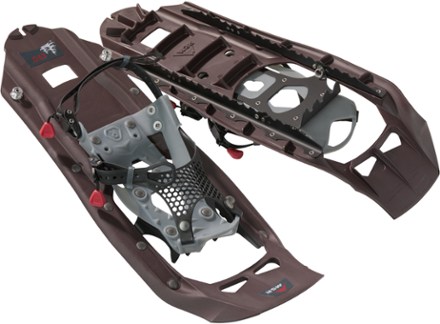
Which snowshoes are being reviewed?
These little beauties, the MSR Revo Ascent, available in several places:

MSR snowshoe review:
let's talk specs
Every woman knows that a shoe wardrobe makes sense.
You wear sandals to the beach, you wear flats to the grocery store... form follows function, right?
Same idea with snowshoes.
If you're just now starting to think about snowshoeing, read about snowshoe designs.
Otherwise, these specifications won't make sense.
MSR Revo Ascent 22 inch women's snowshoes:
- 22 x 8 x 2 inches
- Weight: 2 pounds per snowshoe
- Recommended max load: 180 pounds
- Frame material: DTX (Martensetic) steel
- Deck material: injection molded plastic
- Rubber strap closure method
- Toe crampons for extra stability
- Heel lifts
- Also available in 25 inch length (210 pound max load)
- Optional 5 inch modular flotation tails
- Made in United States
Note
These are similar to the MSR Lightning Ascent snowshoes, which cost ~$60 US more, but are 4 ounces lighter (frame is aluminum) and probably hold up better against rock gouges due to a TPU-coated nylon deck.
Be sure to choose the right shoes for the terrain you plan to enjoy.
MSR snowshoe review:
let's talk ease of use
No need to figure out which snowshoe is left, which is right.
- Hard to see the R in the middle of the photo under bright conditions, so I helped you:

Also notice the straightforward "metal tooth goes in the hole" binding approach.
Simply pull the rubber strap toward the metal, select the hole which feels snug but not death grip-like, and you're done!
A total of four times does the job:
- one back strap to secure your boot heel
- three forward straps to strap in your arch and toe areas
See the four straps?
 Step one: Get the correct snowshoe seated comfortably beneath your boot.
It's important to position your boot far enough forward from the heel lift, but not so far forward as to bump the plastic decking.
Remember, your foot will be carrying the weight of the snowshoe but also has to move as your stride adapts to the changing terrain.
 Step 2: Get the back binding strapped down tightly, and begin to work on the front strips.
This isn't a hard and fast rule, but for me, strapping my heel in first allows me to feel confident that my foot is in the correct position.
It's also the only strap to lock into place on the inside of my leg, and feels just a tad harder to do if I'm using my non dominant hand.
- Getting it done first makes the rest seem super easy, which it is.
Pull each strap to a snug position
Lock everything down.
 A plastic clip can be slid along the length of each strap to find the best place to secure everything - and avoid a tripping hazard.
Pick up your leg and be sure the snowshoe is attached to it!
Then give it a good shake to check your bindings.
Off you go!
MSR snowshoe review:
let's talk performance
Heel lifts
 Heel lift locked into position
When tackling a long upslope, you want an easy way to get your heel lifts deployed.
Why?
- Increases your traction because it spreads your weight across the frame
- Reduces muscle fatigue from step after step after step up hill
If you're using poles (and really, for stability's sake why aren't you?), reach back with the grip end of your pole and pull the heel lift up.
It's easy to snap it back into place once you've conquered the elevation gain.
Crampons for grip
Note the crampons, with an abundance of metal external traction teeth.
That's what gives you a solid grip on steep slopes or icy patches - which have been known to occur simultaneously!

Bindings
The bindings are as comfortable as it's possible to be with boots and snowshoes on your feet.
- After all, gravity is relentless.
- Expect a tugging sensation, more so when in deep snow.
I must admit that I love MSR bindings because they stay put, don't get all iced up and frozen shut, and can be adjusted easily to much smaller or bigger boot sizes when someone borrows my shoes.
They stay pliable even in cold temperatures (MSR rates them to -20F).
They're simple to operate, even with the diminished dexterity of gloved hands.
And so easy to release at the end of the day, when I'm tired and just want to get out of my boots.
Who these snowshoes
will - and won't - serve well
This particular model of MSR snowshoes is designed for harsher conditions and challenging terrain.
If you don't mind (or actively seek out) steep slopes, intermittent corrugated cardboard versus deep snow conditions, icy patches, or all of these, putting these snowshoes on your feet will absolutely help you keep your grip without undue leg fatigue.
Less aggressive snowshoers
If you prefer to stick to level terrain, or groomed trails used by cross country skiers or snowmobiles (walking off to the side of the track, of course), these snowshoes are overkill for you.
Take a look at these instead.
Lower price point.
Less aggressive traction.
One less binding strap, so quicker on and off.
But just as durable.
MSR Revo Ascent snowshoes:
conclusion
 All geared up: layered clothing, warm winter boots, trekking poles, and my trusty snowshoes. Now where did I leave my pack??
Great snowshoes, good durability, great for those of us with narrower strides, these are the best equipment for snow travel on a winter hike.
Available at these trusted outdoor gear stores: (affiliate links)
More snowshoeing tips for you
Snowshoeing might seem straightforward, but it takes some planning and the right gear to stay safe and comfortable.
These are the best snowshoeing tips for intrepid women looking to get started with this fantastic sport:
Home page > Best Hiking Gear Reviews >
MSR Snowshoe Review
|
I get emails all the time about what I wear, eat, carry and love to use on the trail. That's
why I provide affiliate links to you: the best gear that I use myself and have seen used by other hikers is instantly
available for your consideration, and the gear company sends a few
pennies per dollar to this reader-supported hiking website. There is no added cost to you! Everyone ends up a winner: Great gear for you, strong gear companies, and more free hiking tips for everyone. Thanks very much for your support. It's warmly and sincerely appreciated. It also helps send these hiking tips to all your virtual trail buddies around the globe. |
 |
|
Diane Spicer was a beginner hiker in 1971, and never stopped hiking. She founded the Hiking For Her community in 2008 to encourage female hikers, those who wanted to begin hiking as well as those who were in love with this fantastic sport already. On this website she shares expert hiking tips and recommendations, gear reviews and photos from her outdoor adventures so you can learn the necessary skills for comfort confidence and safety on a hike. This reader supported website does not use sponsored or promoted content. There are no ads, no AI content or artificially generated or touched up photos, no paid link placements. Everything you read is based on decades of personal hiking experience in many different locations. Please enjoy these expert hiking tips as you explore what hiking offers in any weather, season or location. |
 |
Scraping the contents of the Hikingforher.com website for the purpose of AI (artificial intelligence) LLM (Large Language Model) training is strictly forbidden.
All rights reserved. No duplication of content without permission.
Photo credits: All photos on this website were taken by David Midkiff or Diane Spicer except where noted.
Disclosures
Privacy Policy
Copyright
Media
Hiking For Her is a participant in the Amazon Services LLC Associates Program, an affiliate advertising program designed to provide a means for us to earn fees by linking to Amazon.com and affiliated sites.