
Backpacking Water
Purification and Treatment:
Best Tips For Hikers
By Diane Spicer
Backpacking water purification and/or treatment is an absolute must if you are venturing into areas with untreated surface water as your only drinking water source.
Not being able to rely on surface water without treating it has unfortunately become the rule for backpackers the world over.
Water treatment is the only way to avoid picking up digestive infections such as beaver fever i.e. unpleasant giardia symptoms.
Drop down to the treatment details
Your options for backpacking water treatment and purification include:
What are you trying to avoid?
Microscopic troublemakers are left behind when people and animals leave sweat, blood, feces or urine in ponds, lakes and streams:
- viruses
- bacteria
- protozoa
- worms
They have one mission in life: to seek and find a gut in which to reproduce.
And for your gut, that means unrelenting and sometimes explosive diarrhea, pain, dehydration and other non-fun issues to deal with on a backpacking trip if you play host to one of these invaders.
Sometimes all it takes is 10 little organisms, or a few cysts, to knock you out for days.
Yuck, right?
Before you vow to drink not one drop of surface water on your trip (unrealistic), let's take a clear eyed look at the problem of providing yourself with safe hiking water on a backpacking trip.
- You cannot carry all of the water you're going to need from your own household tap.
- So you're going to have to learn some backpacking water purification and treatment strategies.
It's going to take a bit of time to work through all of the options for clean hiking water here on this page, so please hang in there.
And it will lead to an investment in some backpacking water purification and treatment equipment to keep your health intact.
It's as necessary as your boots and tent, trust me.
We'll start with a question that you'll have to answer again and again on a backpacking trip.
Which type of surface water should I go for
when I need to fill up my water bottle or cook a meal?
Lots of surface water looks clean: a sparkling stream cascading down the rocks from snow melt or a glacier, for instance.
- Notice the emphasis on flowing, cold and clear water.
If you can find a fast moving water source like that, you're less likely to pick up lurkers in your water because they have a tough time hanging around and reproducing.
Ah, if only we could all hike in such lovely places! Backpacking water purification would be one less thing to worry about and prepare for on our gear lists.
But if you can't be surrounded by flowing surface water, what can you use?
Lakes, tarns or ponds

What if there are no cold, flowing streams handy as a water source?
Your backup choice would be water that has had time to settle and is relatively cool and clear.
Take your water from the top layer of the lake or pond, because gravity has helped pull debris and microorganisms into the bottom layers.
If you have to wade out into the water clutching a cooking pot, don't go in like a raging bull; slow, soft steps will avoid churning things up.
- Having the patience to wait a few minutes before gathering your water, also helpful. Take a look around and admire where your legs brought you!
Even better, if you can get away from the shoreline a bit, perched solidly on a log or rock, that's even better because there is less chance of a random pooping event from a passing animal (and I hate to say it, a human in a hurry).
Slow to no flow?
Stagnant, murky water has several problems, such as clogging a filter and hosting mosquitoes (never fun to swallow their larvae).
- Gravity sedimentation will remove some of the murk, insect eggs and plant debris, but it still might be challenging to pull it through a filter. And it will take more time and put extra load on the filter.
- We'll mention pre-filtering soon as a possible aid.
If green, algal-y (word invention?) is all you've got (looking at you, desert pools that dry up intermittently), there are other ways to get that water clean enough to drink, so keep reading.
Alpine rivers flowing off glaciers
 An example of chocolate milky and very cold river water flowing off a glacier in Alaska
You can see the problems, right?
Fast, turbulent, choked with sediment and silt - and you're going to drink that?
Sure, but it's going to take the right approach. Keep reading.
Heavy rainfall
If you go backpacking enough times, you're going to endure a deluge or three.
Try to get to your water sources right before a big dump of rain.
Or wait several hours until a turbulent stream flow settles down.
- You don't want heavy run off and turbulence to increase your odds of running into fecal contaminants if you can avoid it.
- And you don't want a clogged filter or a long wait time for debris to settle out.
Best water source tip for backpacking water purification
You've had the good sense to plan out your water sourcing before you left for the trail.
Once you're there, take a good look around your potential water source before you bend over to access it.
Do you see a lot of footprints, tracks, disturbed vegetation, scuffed up rocks, piles of animal poop?
Any signs of a campsite or human litter such as toilet paper or feminine hygiene products?
Those are signs that animals and humans prefer this location, and when they visit, they are likely to spit, poop, pee, bleed and spread their normal flora around (microbes in their digestive tract and on skin).
These organisms might be brand new to you if you're visiting a new part of the world, or of a particular strain which will challenge your immune system.
- As a backpacker, you are likely to be at less than 100% strength after a few tough days on the trail.
- The last thing you want is a gastrointestinal infection which depletes your body of water, electrolytes, and endurance.
So do your best to find undisturbed locations for access to backpacking water sources, even if it's less convenient at first or second glance.
It can make minimal or haphazard backpacking water purification less risky, too.
Go on, admit it!
Your eyes are not up to the task of determining if there is danger in the water (sorry to diss your eyeballs, but it's true).
There are many unseen sources of water contamination lurking in that "clean" water.
 Looks clean to me! is something you should not be saying
Microorganisms are the main focus here, but be aware that water can harbor other problems.
For instance, heavy metals or pesticides can be a danger in surface water near populated areas, fields or old mines.
- Choose a water purification method with activated carbon to handle this scenario.
Microplastics are also becoming a concern, and there are technologies that deal with that.
So face facts: you're going to have to treat your water correctly, each and every time, to be sure it's safe to drink.
Don't skip these next sentences!
Keep two things in mind during this important distinction:
- A water filter may not remove the tiniest particles called viruses, but a purification method (including a purifying filter) will remove or at least neutralize them along with larger microbes.
- Purification will cost more because it's a higher level of technology to design and manufacture in a form suitable for backpacking water purification.
The choice between treatment and purification is a huge consideration if you are traveling to areas known to be contaminated with human feces loaded with viruses.
And that's just about anywhere that humans have access to surface water - pristine appearing mountain lakes and streams included.
- If there's a boot path or game trail to it, there are pathogens in the water.
Some advice givers say that backpackers in the United States will likely face protozoan and bacterial problems in surface water, rather than viruses.
If you're headed for the Appalachian Trail or the Pacific Crest Trail, I'd say viruses might also be an issue due to overcrowding at campsites and people pooping too close to surface water.
We're seeing elevated risk of catching communicable viruses in the AT shelters already, so be wary of the water sources to stay safe.
Elsewhere in the world, viral diseases become even more likely, especially in heavily traveled areas. But you also want to think about cholera and typhoid bacteria, as they can be endemic to the local population.
Err on the side of total elimination of problems if you're at all worried: backpacking water purification rather than simple filtration.
Now let's ask the pivotal question.
Which water treatment method(s) makes sense for you?
Should a hiking water filter be your first line of defense against dirty drinking water?
Not necessarily.
It all depends on:
- Where you're headed
- How aggressive you want to be about backpacking water treatment
- How much you want to pay for clean water
- How strong your immunity is known to be
- The amount of maintenance you're willing to perform in the field
- How much weight and bulk you want to carry (super important variable if you are a solo hiker)
Let's begin your quest for choosing the right method of backpacking water purification or treatment with a close look at current water filtration methods.
Backpacking water treatment option:
carry a water filter
A filter is just a physical barrier to keep the larger microbes behind as water molecules flow through.
We're talking pore size here.
Size does matter (as any female with enlarged pores on her nose will tell you).
- Worm (helminth) eggs are tricky little devils, and you don't want them to wake up inside your gut (not as dire as the movie Alien, but close when you're far from a toilet).
- Smaller trouble makers are protozoa like the previously mentioned Giardia, but Cryptosporidium (crypto meaning hidden) is also a top contender for your gut real estate.
- Even smaller, bacterial fecal contaminants like E. coli, Campylobacter and Salmonella are deposited in water by animals and humans alike. They are normal flora for all of us, but some of them cause trouble when they move hosts - or when you hike into a new location.
Large, easy to block (relatively speaking, because come on, they're microscopic!) eggs and organisms like these are effectively removed by any water filter on the market.
But there are various methods to push, squeeze or guide the water through the filter.
So let's look at some backpacking water filter options to clean up your water.
And heads up:
- A filter is heavy and bulky when compared with some of the other water treatment options.
- But it has definite advantages.
So keep an open mind as you read.
Removal of bacteria and protozoa via a pump filter
A pump filter has three important pieces:
- pre-filter, intake hose, filter
You place the pre-filter with its flotation device in your water source.
- The float prevents the intake valve from sinking to the mucky or gritty bottom and thus becoming fouled.
Make sure you have a solid connection between the clean intake hose and the water filter.
Have your clean water bottle or other receptacle ready to receive the water.
Two people with clean, dry hands ensure a straight forward filtering event involving the pump handle - with the right type of surface water: deep enough, or flowing enough (see above).
Some filters are designed to screw onto the mouth of a water bottle, making this more readily a one person job.
Pump filters are relatively easy to use when conditions are ideal, but if you have arthritic hands or it's a cold, wet day, pumping gets hard.
And consider the volume of water you need each day.
In a group hiking situation with high water demands, you can rotate the water pumping chores.
- But after a few days, it's going to be tough to psych yourself up for the tedium of the pumping task.
Is there an easier way?
Yup!
Gravity water filters to remove protozoa and bacteria
A gravity filter makes use of the planetary force which drags everything downward (including your backpack as you hike).
So this water treatment method makes use of a simple two bag design, and I'm guessing you've already figured this out:
- The top bag contains the dirty water while the lower bag (labeled "clean") receives water that has flowed through a replaceable in line filter.
No pumping!!!
Can I get an amen?
 Lots of water means a fast filling time for your bag
But before you get too excited about gravity filtration, let me point out a major drawback: fast flowing river water or an accessible deep lake is the ideal source because it fills up the top "unclean" bag lickety split.
Is that where you're headed?
And will the water be free of silt and debris?
If you're hiking in an area where water is scarce (think high alpine, seasonal seepage or trickles), it's going to be tough to nearly impossible to get that bag filled up in any reasonable amount of time.
You'll also have to hang the bags, or at least the top one, so if you're in high alpine or tundra conditions, that might not be an ideal solution to your water filtration.
Don't expect fast results, as you would with a pump filter.
Tip: Do all of your water chores once you're in camp, to be ready for the next day of hiking. This is not an "on the fly" water treatment method.
More to consider: The pliable BPA free plastic bags need to be kept clean, out of direct sunlight for any period of time, and can be brittle in really cold weather.
Not sounding right for you?
There's a third filtration option for larger microbes: squeezing
One more option for you: a squeeze through, or drink through, filtration method.
This approach to clean drinking water is super easy to use: fill up your bottle from any source, and sip or squeeze water into your mouth through a filter.
Or kneel down and drink directly from the surface water through a straw attached to a filter. It's clean before it reaches your lips.
Pretty exciting, right?
You can drink from any surface water sources (use the tips above for best results), and these backpacking water treatment methods will filter OR purify, depending upon your choice and budget.
These small lightweight devices are perfect for supplying your personal clean water needs as you move along the trail. I always carry one as part of my Ten Essentials.
But for preparing medium to large volumes of clean water for cooking and cleaning, they're not so great (see pump and gravity methods above instead).
Read Hiking For Her's review of the LifeStraw Water Filter to decide if this approach would work as your primary water treatment method.
If you want to go as lightweight as possible and still purify your water on a backpacking trip, consider a Lifestraw Go two stage water filtration bottle.
- Read my review here.
Viral removal via backpacking water purification
Here's where backpacking water purification comes into its own.
Why?
Because viruses in water are a completely different kettle of fish (sure, let's mix metaphors, it's all fun and games until someone's gut gets colonized).
Viral particles are so.much.smaller than our wormy, bacterial and protozoal frenemies.
Hepatitis, norovirus, rotavirus: these are the human pathogens you're most likely to meet as a backpacker looking for safe drinking water.
Enter your secret weapon: technology on steroids.
A well designed filter can remove them, if the pore size is small enough.
- That's going to increase the cost of the technology to produce the filter, and thus the cost that you pay to buy it.
So don't grab just any filter if water borne viruses are a concern where you're headed. Slow down and read the product specifications to be sure you're getting what you want in a backpacking water filter.
A filter which promises water purification is telling you that the pore size is guaranteed to be small enough to keep viruses behind, while allowing the even smaller water molecules to flow into your water bottle.
- In an abundance of caution, read the specifications carefully for the exact pore size.
And for the love of all that is healthy, allow murky gunky water to settle for an hour, or run it through a clean bandanna, before you use a filter of this sophistication and cost!
Water filter maintenance
Your water safety is only as good as the filter, right?
Replacing a filter cartridge at regular intervals, and maintaining your filtration system on a daily basis, seem like an additional expense of time and money, but it's really an investment in your health - and ultimately, in the success of your backpacking trip.
A few tips for water filter maintenance as a hiker:
Don't let a newbie handle the filter without some training.
Test your filter for flow rate and tight seals before you leave for your trip.
Bring along replacement parts and know where they go and how to install them.
If you're going into a situation where you have no idea about water quality, carry a replacement cartridge.
Back flush the filter if the intake valve gets clogged, or take time to clean the entire unit if the flow rate drops way off (see my experience below).
An older filter will need more force to push water through, meaning you'll pump harder or wait longer.
Read the manufacturer's specifications to really understand the commitment it's going to take to achieve clean backpacking water under field conditions.
In other words, backpacking water purification technology is only as good as the person handling it.
Make a commitment to yourself and your hiking buddies to be that good person!
My backcountry adventures with water filters
I started using an MSR water filter 15+ years ago.
A few user notes:
- My filter is rather heavy, using a ceramic core with a plastic pump handle (yes, I'm a purifier).
- It has a plastic tube with a Styrofoam float, which is tossed into the water source.
- The pump handle creates suction to draw the water through the filter, and the clean water flows into a water bottle attached to the other end.
I've noticed several problems with this type of filter.
The first was that I had to pump hard to get enough water flowing through the filter: priming took some serious muscle action as well as time.
Second: If the flow rate drops, I take apart the entire *!#? apparatus, clean the ceramic core with the recommended abrasive pad, and reassemble it.
Sometimes not much improvement, but at least I get a good workout every time I pump water!
Another problem was created by my own clumsiness.
I was cleaning the filter in my kitchen sink prior to a trip, and accidentally knocked the ceramic core against the metal sides.
CRACK!
That set me back some cold hard cash to replace the ceramic filter.
One more issue: with murky or debris-filled water sources and no pre filtering, the filter clogged often.
- I had to take it apart, clean off the debris, and reassemble it.
- Irritating!
Plus it added time to my preparations for the next day, robbing me of relaxation time :(
One more "little" thing:
- There's no way to know if/when a filter has failed.
My personal tale of woe:
After a week long backpacking trip near Mt. Adams, my hiking companion came down with blastocystis - even though we filtered all of our water, including our dish washing water.
Obviously, something was amiss.
Operator error?
A weakened immune system?
Or maybe it was a hand washing faux pas? (see below)
Regardless, I still use MSR technology for backpacking water purification on my trips.
MSR is an outdoor gear brand I really trust to get the job done right for a lot of my gear.
Read more here:
Filter recommendations
|
This is the absolute best hollow core filter to stop even the tiniest microbes. Note the sturdy handle! You're gonna fall in love with it ;) It's heavier than most options, but it self cleans and has a fast flow rate. This is a pricey piece of technology, so handle and treat it with utmost respect. |
 MSR Guardian Purifier MSR Guardian Purifier
|
For gravity filtration, consider how much water at one go you want to treat, and choose your system accordingly.
For small amounts of water, such as 2 or 3 liters, consider the Sawyer Squeeze:
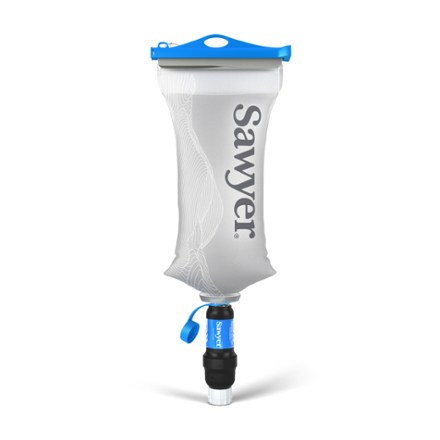
The advantages here are numerous.
You can use a squeeze approach to pushing water through the filter, or if you have more time you can let gravity do the job.
This is light weight, relatively inexpensive, and in addition to stopping bacteria and protozoans it will mop up microplastics (again, consider if this applies to where you're headed).
Platypus also makes good options for water filtration.
Here's a viable solution for group backpacking water supplies, filtering 4 liters in a few minutes at one go.
And you did hear the NO pumping part, right? Gravity becomes your friend!
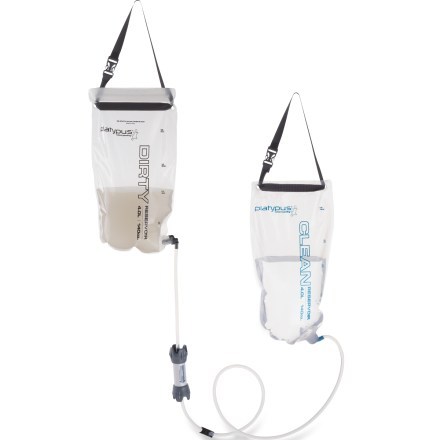 Platypus GravityWorks Water Filter System - 4 Liter
Backpacking water purification filters
Back to the gold standard of pure water: viral removal filters.
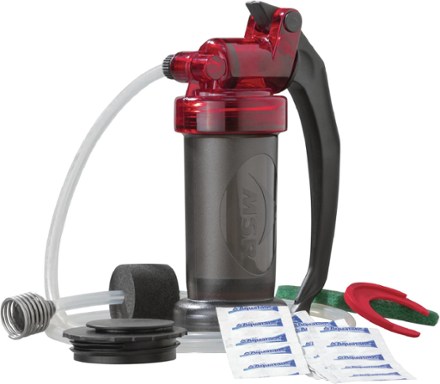 MSR MiniWorks EX Purifier System
You can see my MSR brand bias, but here's an option at a lower price point than the MSR Guardian above.
Note that this treatment system takes the "back up" strategy to new heights by including a chemical treatment along with the ceramic filter.
Treat that filter with care, as noted above!
Backpacking water purification without a filter
But you're not locked into carrying a hiking water filter in your backpack.
There are three other avenues to clean drinking water, each with drawbacks and benefits.
As you read through these options, take mental notes on which could be your primary method, and which strategy makes sense as a viable backup method.
Yes, my dear, you need two methods of backpacking water purification or filtration.
Clean water is THAT important.
Here's your first non-filter option.
Boil your water before using it
This seems easy, right? Nothing high tech to purchase or maintain.
Except a reliable backpacking stove.
Plus extra fuel.
- Extra, extra fuel at higher elevations!
Think weight, cost and bulkiness of that fuel.
And there are a few precautions to take if boiling your water is your preferred method of treatment.
Things to do to ensure clean water when you boil it
The water must reach a rolling boil (not just a few tiny bubbles on the bottom of the pot) for a full minute in order to eliminate viruses, bacteria and protozoa.
- Time this! It's important to your health.
If you're at higher elevations, 6000+ feet, give it a full three minutes of rolling boil.
The water then has to cool down if you're not using it immediately for a meal.
If you forget to boil water in the evening, it's going to take extra time in the morning to get those water bottles or hydration reservoirs full before you can hit the trail.
Tips to make boiling better:
If your water has plant debris, sand
or other detritus, you can pre-filter your water before boiling by
pouring it through a clean bandanna into your cooking pot.
Murky, silty water can be left to sit for an hour and the top water poured off into a cook pot for boiling.
Don't mix up clean and dirty water bottles.
- If you've boiled water, it should go into a washed vessel (bottle, reservoir, bladder, pot) and segregated from "to be boiled" water.
- If in doubt, re-boil.
Good & bad news about boiled water
The good thing about boiled water: it kills all microscopic pathogens, including those hard to filter viruses, so your water has been purified.
The bad news?
Boiled water will taste flat.
Give it a good shake to add some oxygen back to it.
If you have a personal straw with you (hey, it's a thing!), bubble some O-2 through.
You might also need to add a little something to jazz it up.
- Flavored electrolytes might do the trick, AND provide you with skeletal muscle benefits.
Here's one of the brands I use, available in a mind bending variety of flavors:
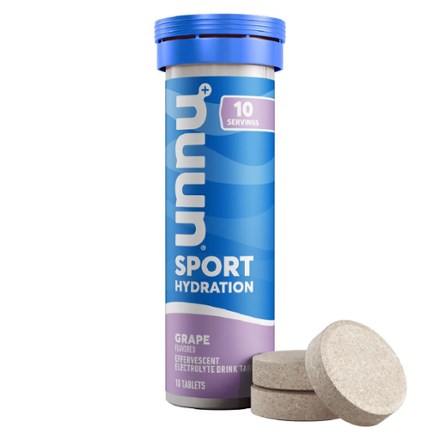 NUUN Active Tabs Hydration Tablets
Chemical treatment for potable hiking water
Another way to purify water (remove the threat of ALL microscopic pathogens, including viruses) is to add chemicals to it.
Chlorine (think household bleach) and iodine both mess up all microbes, so pick your poison (literally).
But wait, won't it poison you, too?
Not in small quantities, no.
If you're looking for the smallest, most lightweight and inexpensive method for backpacking water purification, look no further!
Read the instructions, drop the tablets into the water, and after the correct amount of time has passed (which can be hours, not minutes), you'll have water that is devoid of viable troublemakers.
- Extremely cold water will take longer for the chemicals to work. Remember solubility from chemistry class?
Tip:
Consider this as your first choice for a back up option if you prefer a different primary method of backpacking water purification.
Nothing can go wrong here, unless the tablets contact water before you're ready for them to!
- Hint: double plastic bags
A bit of chemical nostalgia - not!
I remember adding drops of iodine to my drinking water way back when, as in when no water filters were on the market for backpackers.
It tasted beyond awful!
And I remember adding flavored drink mixes (Tang, anyone?) to the water, just to be able to choke it down.
But at least it was a safe backpacking water purification method, right?
Today, you have the option of using chemicals which are a new generation of effectiveness.
- Read about these tablets and decide if it's the right approach to back country water purification for you.
After all these decades, iodine will still leave a metallic taste in your mouth, so be prepared to neutralize the nastiness by adding a little something to your treated water.
- See Nuun above
A few more notes about iodine:
it's ineffective against Cryptosporidium.
And you don't want to ingest iodine if you're pregnant or have a thyroid disorder.
So it's pretty clear by now that I'm team chlorine.
To go super low budget, you can bring along chlorine bleach and add it to your water, but why mess around with corrosive liquids in your backpacking gear?
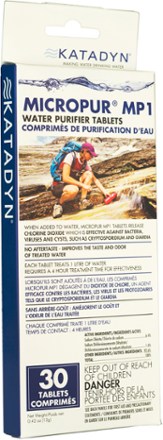 Katadyn Micropur Purification Tablets Katadyn Micropur Purification Tablets
|
Here's a chlorine dioxide tablet option, similar to what is used in municipal water systems. Effective against viruses after sitting for four hours, hurrah! But pay attention to shelf life, as the potency degrades over time. |
Ultraviolet (UV) light treatment
for backpacking water purification
Not a fan of chemicals? Lucky you, another choice is yours.
Ever heard of a SteriPen?
Steri stands for sterilization, the removal of life from the water using ultraviolet light.
And you know what a pen looks like!
As a microbiologist, I understand how UV rays can eliminate microorganisms by mutating the DNA or outright killing the cells and viruses.
- Messes them up, big time!
- Also a good reason for you to wear sunglasses and sunscreen to block the sun's UV rays on a hike, just sayin' ;)
Field research confirms that these devices work as advertised to purify your water.
Easy to use: stick the UV ray emitting end into your water receptacle, wave it around for the recommended time, and you're good to go.
Lightweight, compact, and really handy to have in weather that is less than ideal because you're not using your hands to pump or waiting for gravity to do its thing.
You don't have to replace any filters, but you do have to keep an eye on the battery life or your water purification method is no more.
- Add "extra batteries" to your gear list.
This method is not the way to go with large volumes of water.
Pre-filtering cloudy water first is absolutely necessary, so the UV rays can do their zapping damage.
This is the one I'm considering adding to my hiking gear repertoire for backpacking water purification purposes:
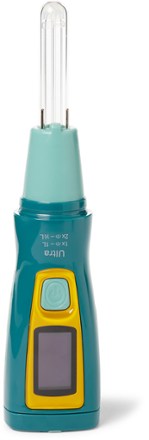 Katadyn Steripen Ultra UV Water Purifier
Just so you know, SteriPens come in various options at different price points.
Here's another one to consider:
But what about the naysayers?
Sooner or later, you're going to run into a hiker who swears she has never treated her water, not once, not ever.
Why should she? She's never gotten sick, you weakling!
Two possible explanations: untruth, or an immune system which has yet to meet its match.
Denial is a river in Egypt, they say...
Treat it first, then glug, glug, glug
So by now you might have come to this conclusion: unless you absolutely have to in a survival situation, don't drink surface water without treating it.
[Caveat:
If you find yourself in one of the few untouched by humans locations on Earth, feel
free to gulp down untreated ice cold glacier or melt water by the liter. I do it every year on my remote backcountry adventures.]
Regardless of the method you choose, you want it to be:
- lightweight
- reasonable size and volume in your backpack or easily accessible outer pocket
- able to treat enough water for your needs (solo, duo, group consumption)
- easy to use
- easy to maintain & replace parts as needed
- cost effective for your backpacking budget and length of trip
- reliable - most important!
When you use the REI Co-op website, you can compare various options for all of these variables, side by side. REI members receive yearly rebates on gear purchases along with a generous return policy, so factor that into the cost you pay up front.
- See the dozens of reasons a hiker should join REI Co-op
And to get you started, REI provides a free comparison chart of water treatment methods here.
Quite handy for beginner backpackers, or for keeping up with new technology for hikers.
While I've got you here, let's say this: Always store your backpacking water treatment system clean and dry, ready to go for next time. Replace parts that are iffy, like the plastic tubing or bags, before they leak and ruin your backpacking trip.
And now for a few more tips before you leave.
Practice impeccable hand hygiene
on your backpacking adventures
You don't want to go to all of this trouble to choose a water treatment or purification method, learn to use it appropriately, haul it around and treat your water with it, only to introduce microscopic troublemakers from your own dirty hands.
At least I don't think you do!
Enforce a strict "wash your hands" policy for everyone who is treating water or filling water bottles.
Keeping all hands clean for food preparation is non-negotiable, too.
Keep track of dirty and clean water bottles, cooking pots, etc. with some sort of system and be sure everyone understands what it is.
Use clean water for tooth brushing, dishwashing and rinsing.
Sanitize your hands before plunging them into clean dish water.
Keep your unwashed hands out of your mouth, nose and eyes.
Bring your hygiene kit and be scrupulous about using it after you defecate and urinate.
Okay, end of lecture ;)
Oops, almost...
Clean hand strategies to back up your
backpacking water purification
Here's an important question for you as you plan your backpacking trip: Soap or hand sanitizer?
Soap comes in liquid or flake forms, while sanitizer is liquid.
I prefer carrying a tiny bottle of concentrated soap for two reasons:
- It doesn't dry out my skin or sting on application like alcohol based sanitizers.
- The lathering action of frothy soap ensures that I'm using a physical method to remove microbes from my skin along with the chemical action of the soap.
I'm a big fan of Dr. Bronners unscented soap for dishes and personal hygiene.
Go ahead and splurge: it's the best investment in your health that a small amount of money can buy. Peace of mind is worth that pittance.
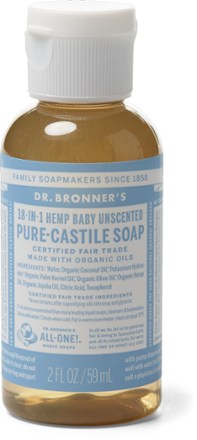 Dr. Bronner's Baby Mild Liquid Soap
One more clean water note
We all deserve clean water.
Use Leave No Trace practices so the next backpacker coming down the trail tomorrow or next year has some, too.
Bottom line for backpacking water purification methods
You probably thought I'd never get there! I had a lot to share about this important topic for hikers.
Here's the punch line:
Because water is important to a high functioning hiker's body, never deprive yourself of this vital fluid.
Just be sure it's safe before consuming it.
Select the right approach to treating your water: think in terms of volume, cost, ease of use and time investment.
Practice using your chosen method at home a few times before you hit the trail.
Once you choose a primary method of water purification, also carry a back up method.
You're so worth it!!

Home page > Best Backpacking Tips >
Backpacking Water Purification
Hiking For Her offers only the recommendations that work hard for you on the trail, based on personal usage and research.
By purchasing through this website, you pay nothing extra and allow HFH to continue freely sharing trusty, virus free trail tips.
|
I get emails all the time about what I wear, eat, carry and love to use on the trail. That's
why I provide affiliate links to you: the best gear that I use myself and have seen used by other hikers is instantly
available for your consideration, and the gear company sends a few
pennies per dollar to this reader-supported hiking website. There is no added cost to you! Everyone ends up a winner: Great gear for you, strong gear companies, and more free hiking tips for everyone. Thanks very much for your support. It's warmly and sincerely appreciated. It also helps send these hiking tips to all your virtual trail buddies around the globe. |
 |
|
Diane Spicer was a beginner hiker in 1971, and never stopped hiking. She founded the Hiking For Her community in 2008 to encourage female hikers, those who wanted to begin hiking as well as those who were in love with this fantastic sport already. On this website she shares expert hiking tips and recommendations, gear reviews and photos from her outdoor adventures so you can learn the necessary skills for comfort confidence and safety on a hike. This reader supported website does not use sponsored or promoted content. There are no ads, no AI content or artificially generated or touched up photos, no paid link placements. Everything you read is based on decades of personal hiking experience in many different locations. Please enjoy these expert hiking tips as you explore what hiking offers in any weather, season or location. |
 |
Scraping the contents of the Hikingforher.com website for the purpose of AI (artificial intelligence) LLM (Large Language Model) training is strictly forbidden.
All rights reserved. No duplication of content without permission.
Photo credits: All photos on this website were taken by David Midkiff or Diane Spicer except where noted.
Disclosures
Privacy Policy
Copyright
Media
Hiking For Her is a participant in the Amazon Services LLC Associates Program, an affiliate advertising program designed to provide a means for us to earn fees by linking to Amazon.com and affiliated sites.